
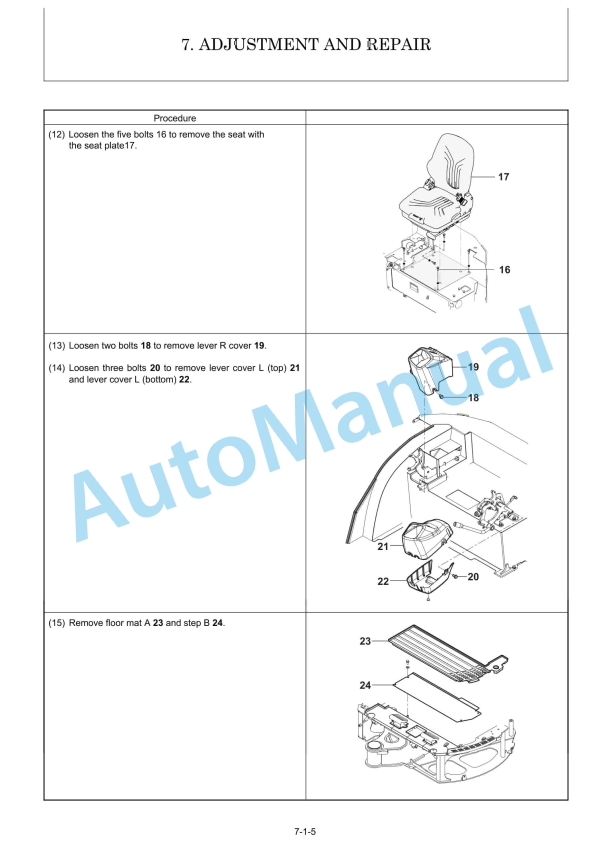
Description
-
Model List:
- ViO27-6 Mini Excavator
- 1. General Cautions for Maintenance Work
- 1.1. Correct Work
- 1.2. Safety Precautions
- 1.3. Preparations
- 1.4. Cautions for Disassembly and Reassembly
- 1.5. Cautions for Removal and Installation of Hydraulic Equipment
- 1.6. Cautions for Removal and Installation of Hydraulic Piping
- 1.7. Cautions for Handling Seals
- 1.8. Correct Installation of Hydraulic Hose
- 1.9. Specifications of Hydraulic Hose
- 1.10. Air Release of Hydraulic Equipment
- 2. Technical Data
- 2.1. Specifications
- 2.2. Outline Drawing and Working Area
- 2.3. Weight List of Main Parts
- 2.4. Lifting Capacity List
- 2.5. Specifications for Attachment
- 2.6. Periodic Inspection and Servicing
- 2.7. Fuel, Lube Oil and Grease Recommended
- 2.8. Hydraulic Circuit Schematic
- 2.9. Wiring Diagram
- 3. Service Standards
- 3.1. Machine Performance
- 3.2. Engine
- 3.3. Undercarriage
- 3.3.1. Rubber Track Specifications
- 3.3.2. Steel Track Specifications
- 3.3.3. Common Specifications of Steel Rubber Crawlers
- 3.4. Controls
- 3.5. Hydraulic Equipment
- 3.5.1. Hydraulic Cylinders
- 3.6. Implement
- 3.6.1. Front Attachments
- 3.6.2. Blade Moving Device
- 3.7. List of Tightening Torque
- 3.7.1. Machine
- 3.7.2. Engine
- 3.7.3. Tightening Torque for General Bolts and Nuts
- 3.7.4. Hydraulic Fitting
- 3.8. Pressure Adjustment
- 3.8.1. Relief Valves
- 3.8.2. Swing Brake Valve
- 3.8.3. Cut-Off Valve
- 4. Engine
- 4.1. Safety
- 4.1.1. Safety Statements
- 4.1.2. Safety Precautions
- 4.2. Engine
- 4.2.1. Before You Begin Servicing
- 4.2.2. Special Service Tools
- 4.2.3. Measuring Instruments
- 4.2.4. Cylinder Head
- 4.2.5. Measuring and Adjusting Valve Clearance
- 4.2.6. Crankshaft and Camshaft Components
- 4.3. Fuel System
- 4.3.1. Before You Begin Servicing
- 4.3.2. Introduction
- 4.3.3. Special Service Tools
- 4.3.4. Measuring Instruments
- 4.3.5. Fuel System Diagram
- 4.3.6. Fuel System Components
- 4.3.7. Fuel Injection Lines
- 4.3.8. Fuel Injection Pump
- 4.3.9. Checking and Adjusting Fuel Injection Timing
- 4.3.10. Fuel Injectors
- 4.4. Cooling System
- 4.4.1. Before You Begin Servicing
- 4.4.2. Introduction
- 4.4.3. Cooling System Diagram
- 4.4.4. Engine Coolant Pump Components
- 4.4.5. Engine Coolant System Check
- 4.4.6. Engine Coolant Pump
- 4.5. Lubrication System
- 4.5.1. Before You Begin Servicing
- 4.5.2. Introduction
- 4.5.3. Lubrication System Diagram
- 4.5.4. Checking Engine Oil Pressure
- 4.5.5. Trochoid Oil Pump
- 4.6. Starter Motor
- 4.6.1. Before You Begin Servicing
- 4.6.2. Introduction
- 4.6.3. Starter Motor Specifications
- 4.6.4. Starter Motor Troubleshooting
- 4.6.5. Starter Motor Components
- 4.6.6. Starter Motor
- 4.7. Alternator
- 4.7.1. Before You Begin Servicing
- 4.7.2. Introduction
- 4.7.3. Alternator Specifications
- 4.7.4. Alternator Troubleshooting
- 4.7.5. Alternator Components
- 4.7.6. Alternator Wiring Diagram
- 4.7.7. Alternator Standard Output
- 4.7.8. Alternator
- 4.8. Electric Wiring
- 4.8.1. Electric Wiring Precautions
- 4.9. Troubleshooting
- 4.9.1. Special Service Tools
- 4.9.2. Troubleshooting By Measuring Compression Pressure
- 4.9.3. Quick Reference Table For Troubleshooting
- 5. Electric System
- 5.1. Electric Equipment of Machine
- 5.1.1. Parts Layout of Electrical Equipment
- 5.1.2. LCD Monitor and Alarm Systems
- 5.2. Circuit Description of Engine Start and Stop
- 5.2.1. Engine Start and Stop
- 5.2.2. Battery charge
- 5.3. Automatic Deceleration System
- 5.3.1. Main Components and Wiring Diagram
- 5.3.2. Function and Control
- 5.3.3. Error Indication of Auto Deceleration Alarm Lamp
- 5.4. Error Code List
- 6. Hydraulic System
- 6.1. Outline
- 6.1.1. Control Valve Operation
- 6.2. Circuit Operation
- 6.2.1. Boom
- 6.2.2. Arm
- 6.2.3. Bucket
- 6.2.4. Swing
- 6.2.5. Boom Swing
- 6.2.6. Blade
- 6.2.7. Travel
- 6.2.8. Non-Deviation Travel (with Boom, Arm,Bucket or Boom Swing Operation)
- 6.2.9. Simultaneous Operation of Boom Upand Arm Retract
- 6.2.10. Simultaneous Operation of Boom Upand Bucket
- 6.2.11. Simultaneous Operation of Boom Upand Swing
- 6.2.12. Simultaneous Operation of Arm andBucket
- 6.2.13. Hydraulic P.T.O. 1
- 6.2.14. Hydraulic P.T.O. 2
- 6.2.15. Travel Alarm (Optional)
- 6.2.16. Auto Deceleration
- 6.3. Hydraulic Pump
- 6.4. Control Valve
- 6.5. Pilot Valve
- 6.6. Swing Motor
- 6.7. Travel Motor
- 7. Adjustment and Repair
- 7.1. Engine and Electric Equipment
- 7.1.1. Removal and Reinstallation of Engine
- 7.1.2. Removal and Reinstallation of Starter Motor
- 7.1.3. Removal and Reinstallation of Radiator and Oil Cooler
- 7.1.4. Removal and Reinstallation of Fan Belt
- 7.2. Undercarriage
- 7.2.1. Outline
- 7.2.2. Main Parts
- 7.2.3. Points of Reassembly (Rubber Track)
- 7.2.4. Points of Reassembly (Steel Track)
- 7.2.5. Removal and Reinstallation of Track
- 7.2.6. Removal and Reinstallation of Travel Motor
- 7.2.7. Disassembly and Reassembly of Idler
- 7.2.8. Disassembly and Reassembly of Track Roller
- 7.2.9. Disassembly and Reassembly of Carrier Roller
- 7.2.10. Installation of Floating Seal
- 7.2.11. Drawings of Jig
- 7.3. Controls
- 7.3.1. Mechanical Control Linkage
- 7.3.2. Adjustment of Travel Levers
- 7.3.3. Adjustment of Boom Swing Pedal
- 7.3.4. Adjustment of Blade Lever
- 7.3.5. Adjustment of Lock Lever
- 7.4. Swing Bearing
- 7.5. Hydraulic Equipment
- 7.5.1. Removal and Reinstallation of Hydraulic Pump
- 7.5.2. Removal and Reinstallation of Control Valve
- 7.5.3. Removal and Reinstallation of Pilot Valves (L and R)
- 7.5.4. Removal and Reinstallation of Swing Motor
- 7.5.5. Removal and Reinstallation of Swivel Joint
- 7.5.6. Disassembly and Reassembly of Swivel Joint
- 7.5.7. Disassembly and Reassembly of Hydraulic Cylinder
- 7.5.8. Removal and Reinstallation of Fuel Tank
- 7.5.9. Removal and Reinstallation of Hydraulic Oil Tank
- 7.5.10. Piping Layout
- 7.6. Work Implements
- 7.6.1. Removal and Reinstallation of Work Implements
- 7.7. Cabin
- 7.7.1. Removal and Reinstallation of Cabin
- 8. Troubleshooting
- 8.1. Non-Breakdowns
- 8.1.1. Natural Release of Bucket
- 8.1.2. Discontinuous Arm Movement
- 8.1.3. Drifting of Upperstructure on Quick Travel Operation
- 8.1.4. Thermal Shock of Travel Motor
- 8.1.5. Elongation of Boom Swing Cylinder on 65 degrees Swing
- 8.1.6. Time Lag on Travel Speed Switching
- 8.1.7. Fluctuation in Oil Level of Hydraulic Oil Tank Due to Temperature Change
- 8.2. Quick Reference Table for Troubleshooting


,%202GM20(F)(C),%203GM30(F)(C),%203HM35(F)(C)%20Marine%20Diesel%20Engine%20Service%20Manual&url=https://pdfrepairmanual.com/docs/yanmar-1gm10c-2gm20fc-3gm30fc-3hm35fc-marine-diesel-engine-service-manual/&media=https://pdfrepairmanual.com/wp-content/uploads/2026/01/yanmar-1gm10c-2gm20fc-3gm30fc-3hm35fc-marine-diesel-engine-service-manual-1.jpg)
There are no reviews yet.